Overview
hucksh is a cross between bash, screen, ssh, sql, and probably some other things. A server program runs on your computer (similar to sshd), listens for commands from clients, runs them, and sends back the output. The server writes all commands, and their output, to a sqlite3 database, which is queryable by the user, and which can be used to update the client.
There are two clients: a cli that lets you run commands from your regular bash/zsh/whatever command line, and a custom GUI client.
Here’s a preview of the GUI client.
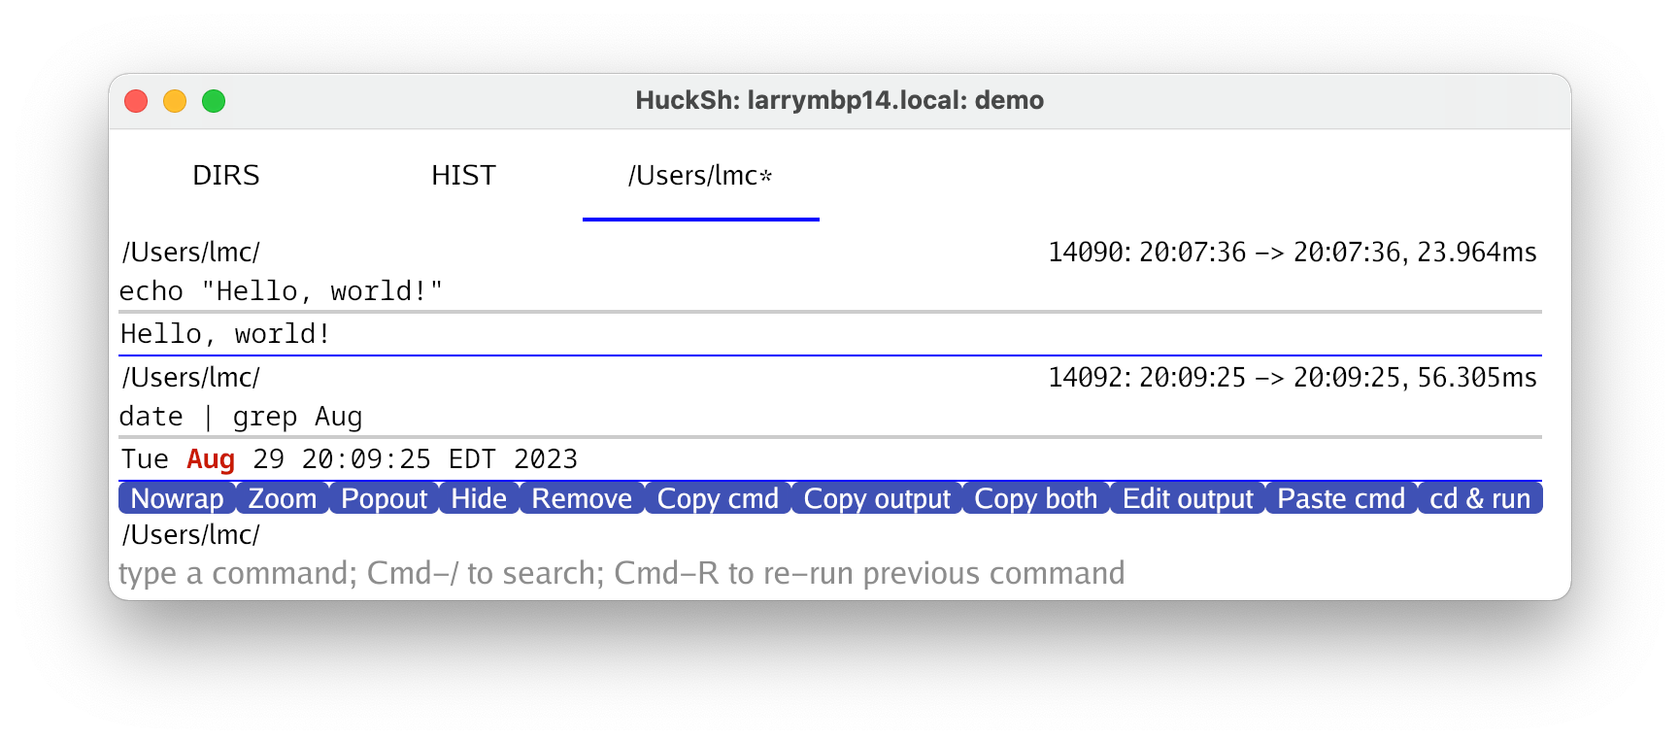
Several things are immediately obvious:
- It has a tabbed interface
- For each command, it shows
- the
$PWDof the command - a command ID number (e.g. 14090)
- start, stop, and elapsed time
- the command itself
- the command output
- the
- There’s a place to enter the next command.
I’ll go into more detail for each tab below.
Why?
So happy you asked. See Why hucksh? What makes hucksh different?
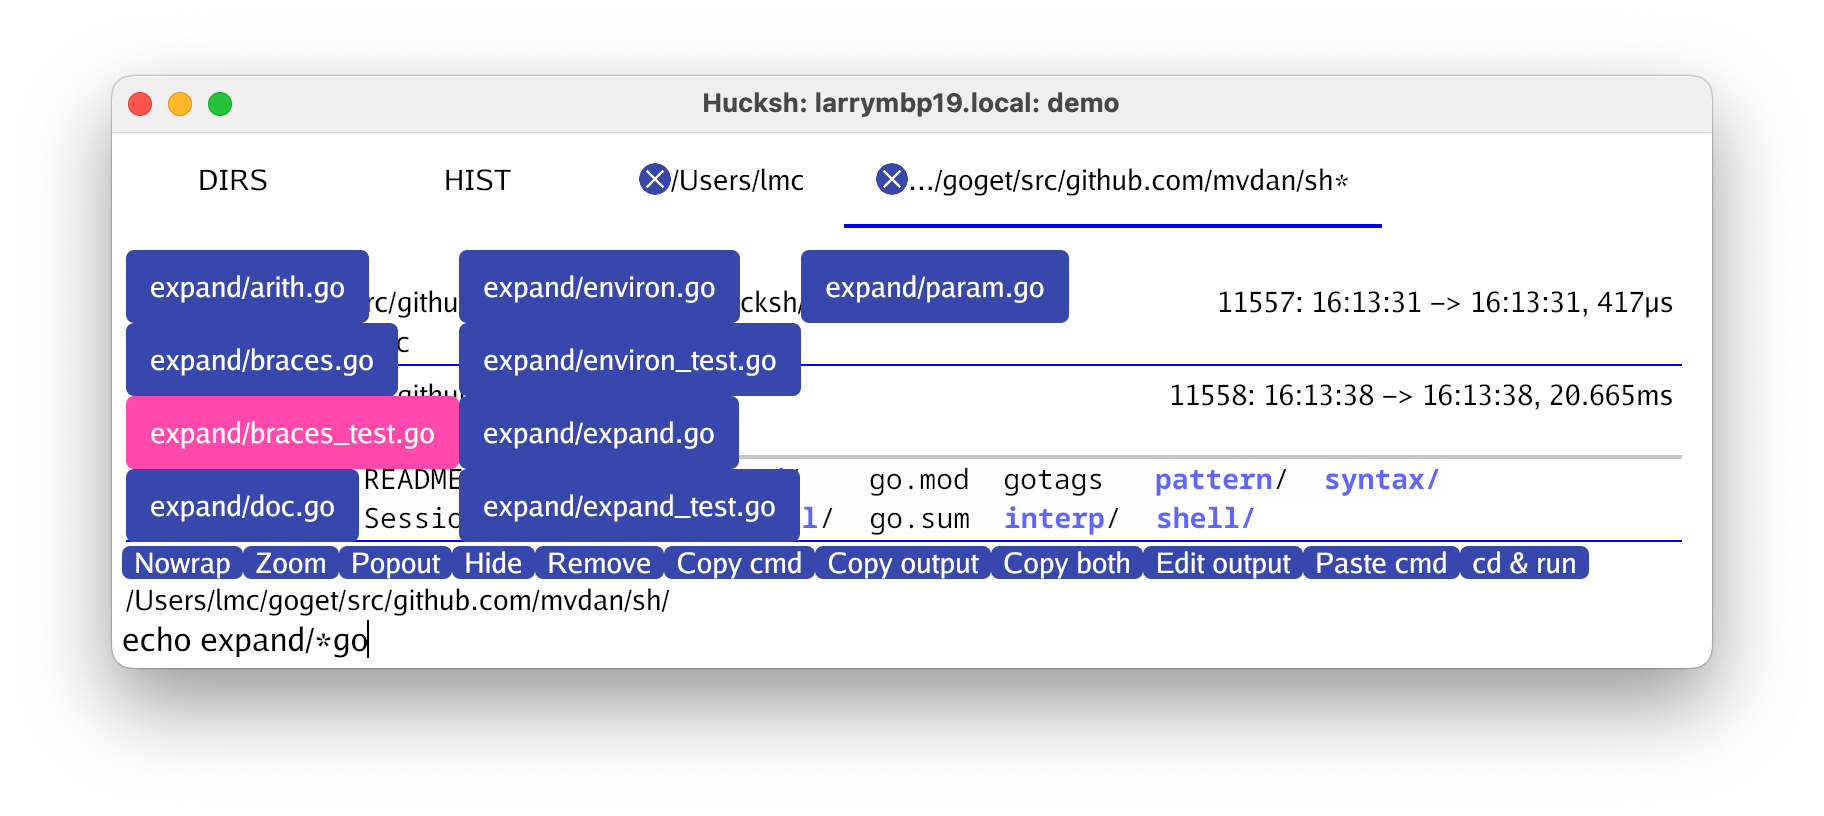
The shell tab

As shown above, a shell tab displays past commands, and has a place to enter new commands. So far it’s a lot like a regular TTY-based shell.
Unlike a TTY-based shell, the hucksh GUI automatically displays the current directory when a command was run, the command ID (which is not the PID), the start, stop, and elapsed time of a command, as well as the command itself and its output.
At the top, in the tab title, is that tab’s PWD, with an asterisk (*) to denote that this is the current tab. This becomes more useful when you have multiple shell tabs.
Shell Tab buttons
Something TTY-based shells also don’t have is the list of buttons along the top of the command entry window:

For each command, there are eleven buttons you can press.
- Nowrap: Don’t wrap long lines.
- Zoom: Open the command in its own tab.
- Popout: Open the command in its own toplevel window.
- Hide: Hide all command output.
- Remove: Remove the command from the tab. (It’s still in the database and can be recovered.)
- Copy cmd: Copy the command text to the system clipboard.
- Copy output: Copy the command output to the system clipboard.
- Copy both: Copy both the command text and output to the system clipboard.
- Edit output: open an external editor on the command output.
- Paste cmd: Paste the command into the command editor.
- cd & run: cd to the command’s PWD and run the command again.
Here’s what you get if you press the “hide” button on command 14092:
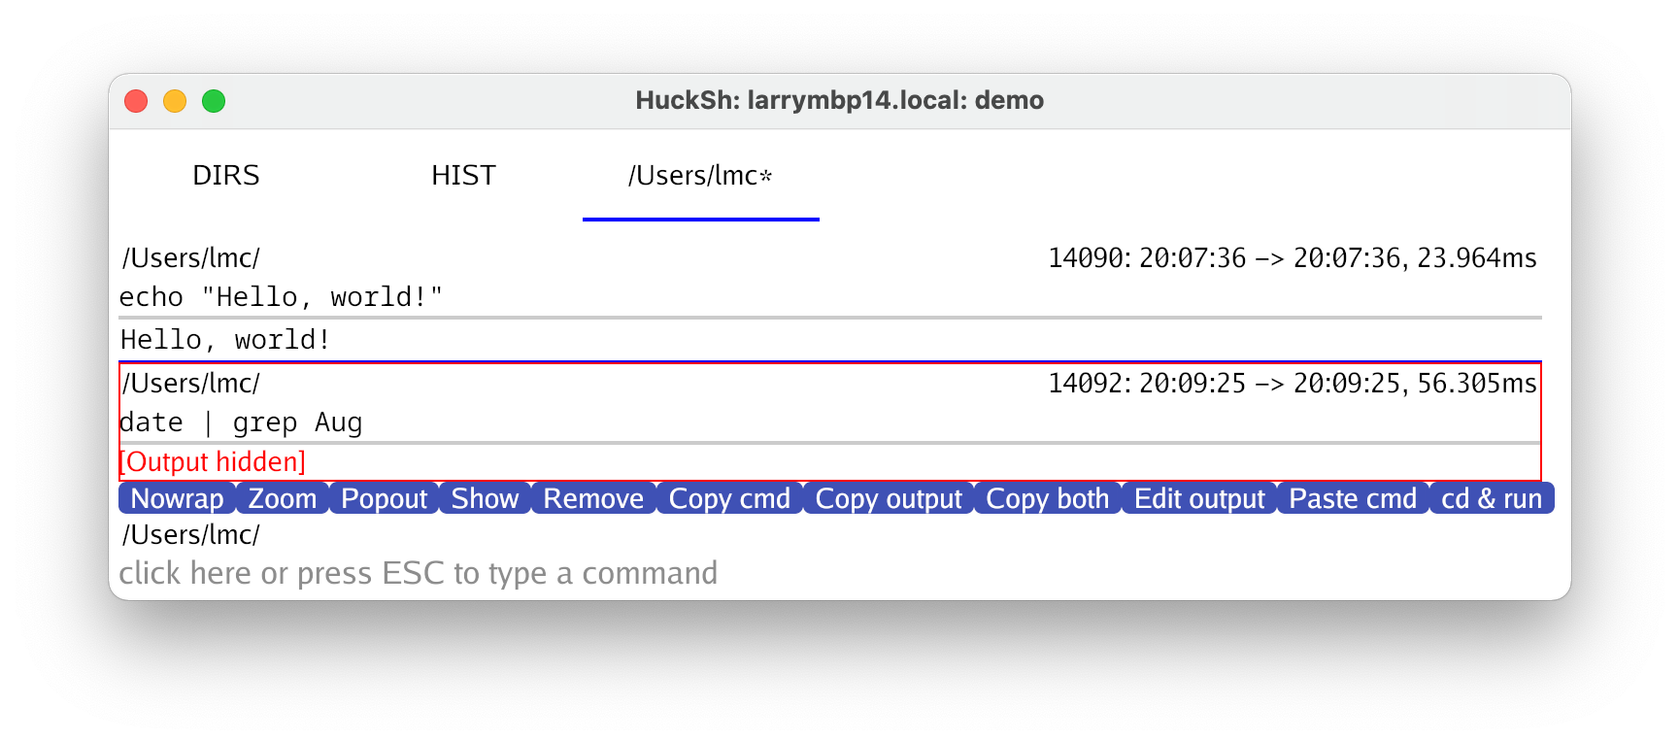
The command only had one line of output, so it’s not very dramatic, but when you’ve got more output, e.g. if you’ve accidentally cat’ed a binary file, it can be handy.
Here’s what you get if you press the “Remove” button on 14092:
The command is just removed from the interface.
And here’s how to get it back:
hucksh tab --add 14092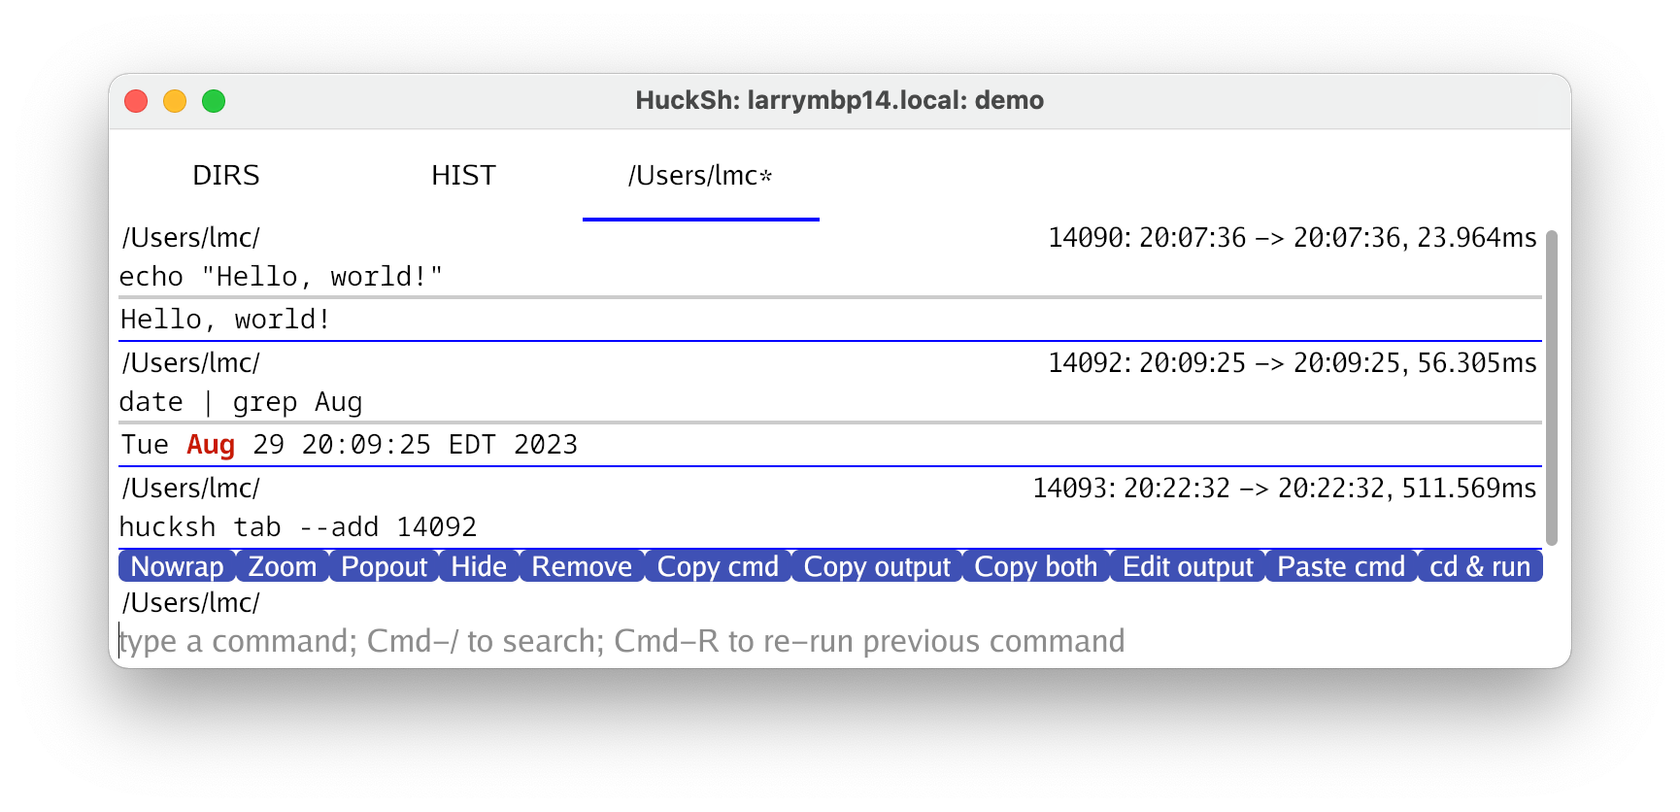
I ran the above hucksh tab command to add 14092 back to the UI, and it did.
There are other arguments to the tab subcommand to let you add or remove one or more commands from the current tab, and to completely replace all the commands in the tab.
Using the hucksh database
Combined with querying the database mentioned above to get the required command IDs, this allows for some very handy contextual retrieval, like “show all the commands run in this directory“, or “show all commands run in this directory tree“, or “show all commands that rsync to or from a particular hostname“, etc. The query language is regular sql. The distribution tarball includes a “huckshrc” file with several functions pre-defined to make all this easier. See the Using the hucksh database page for more information.
Timestamps
Frequently it’s handy to know exactly when a line was output, or how long it took after the current line to print the next line. For example, log files tend to have timestamps at the front of each line. Hucksh keeps track of when each line on the screen was output or last updated and can display this information with a hotkey, Cmd-Opt-Shift-T (Linux/Windows: Ctrl-Alt-Shift-T). It looks like this:

brew upgrade running with times shown.The times on the right show the time the line was output or updated, and how long since the previous line (if >= 1ms). In this example, the command started at 12:27:09, and the first line is shown to’ve appeared at 12:27:20.56, 10.734s later.
Running commands is pretty standard stuff. Hucksh also offers easy directory navigation, and directory history. See below.
Completion
Like most shells, hucksh does environment variable, filename, and command completions. It looks like this:
Completions are invoked by pressing TAB or Ctrl-D. See the “Shell completion panel” section of the Usage page for more hotkeys.
Directory browsing and navigation
Directory browsing
The first tab shown above is DIRS. Here it is.
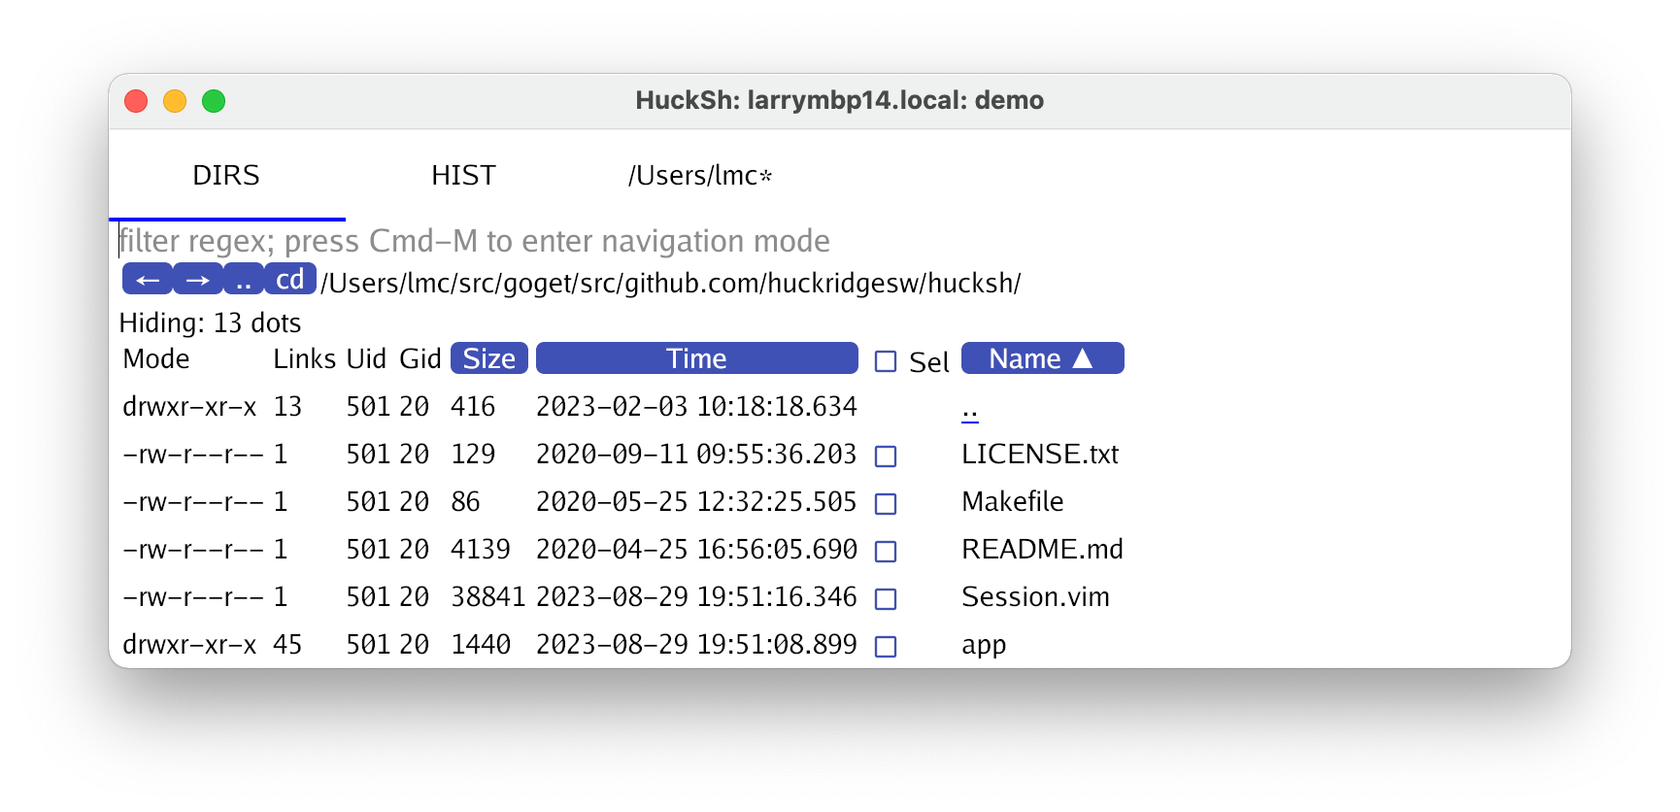
This is the directory browser, with a bit of my hucksh development tree shown.
From the top down:
- You can type a regular expression to filter directory names. You can also press Ctrl/Cmd-M to enter “navigation mode”, about which more below.
- You can go backwards (“←”) or forwards (“→”) in your visited directory history.
- You can go up a directory (“..”)
- You can
cdto the current directory back in your current shell tab, and switch to that tab. (You can also just press enter to do the same thing.) - Size, Time, Name: Sort by those columns.
- Selection boxes: Select individual directory entries, or all at once.
There are also hotkeys to hide or show directories, files (non-directories), and entries that start with a dot. In the above image, the UI notes that 13 dotfiles are hidden.
Navigation mode
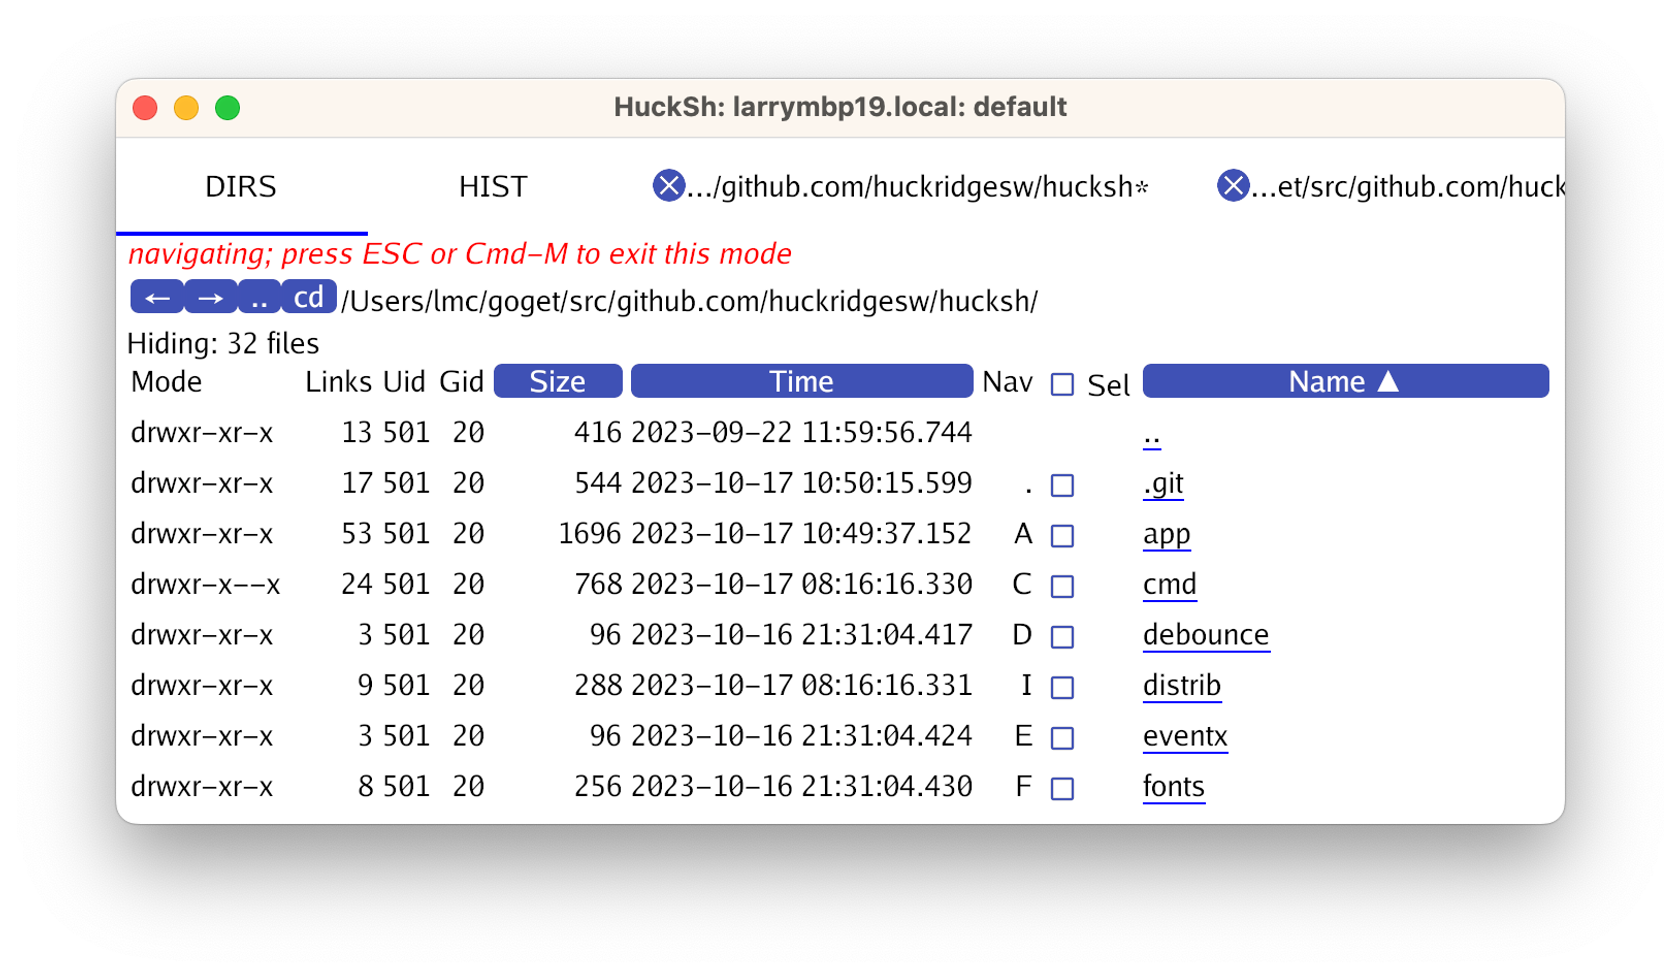
If you press Ctrl/Cmd-M, the directory panel enters “navigation mode”. This allows easy one-key navigation of the directory tree. Above, you could press “A” to display the “app” directory, or “C” to display the “cmd” directory. Once you got there, then you could press further keys to navigate deeper into the directory tree.
Selection mode
If you select some files, then you can do two things: Copy their names to the clipboard, or edit them.
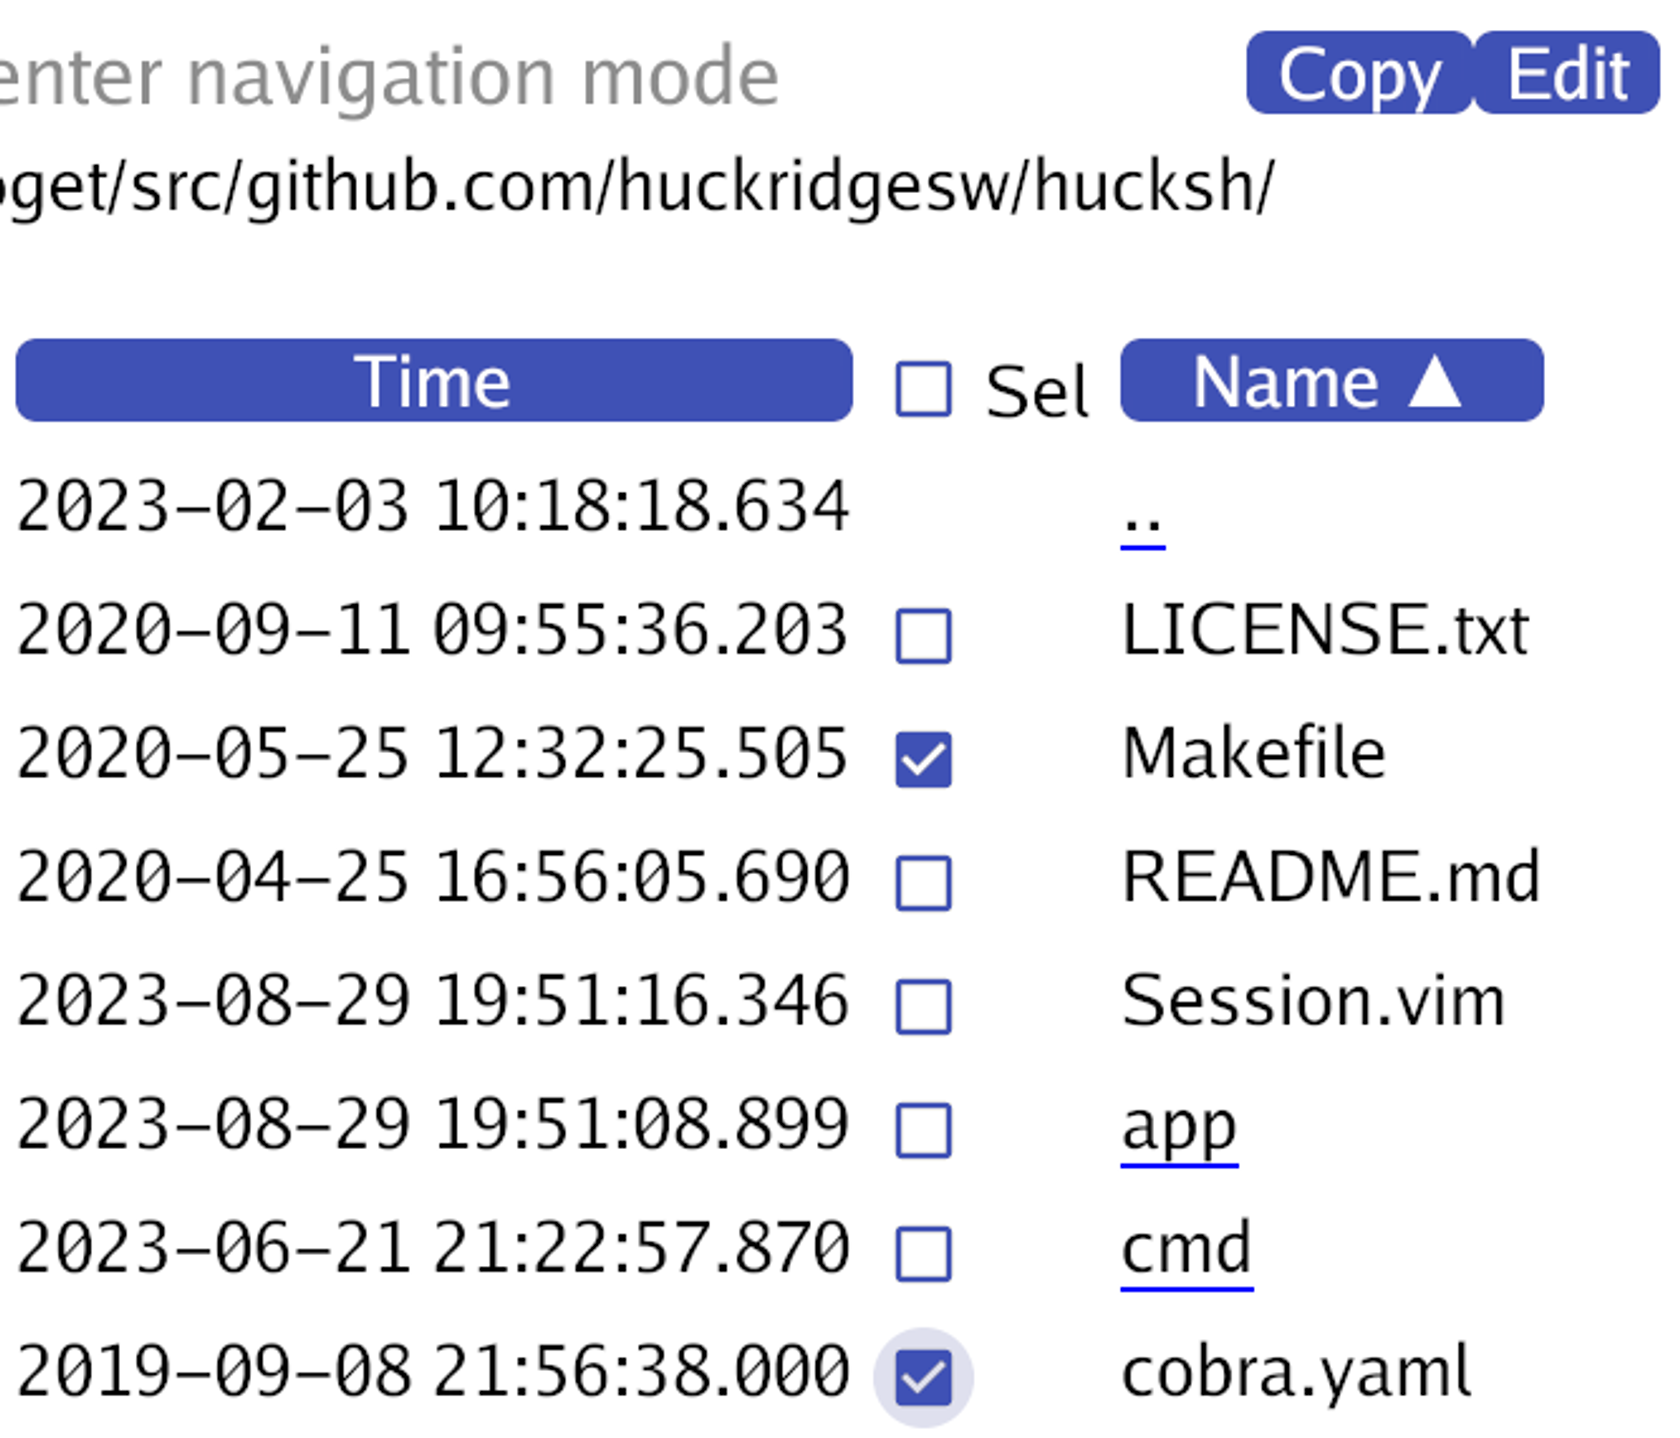
Here I’ve selected the Makefile and cobra.yaml files, and two buttons have popped up: Copy and Edit.
The Copy button will copy all selected filenames to the system clipboard, for pasting in the command editor or elsewhere.
The Edit button will open an editor on the selected files. This works even with files on a remote server, via (for example) the standard Vim netrw plugin. In the above case, the GUI indirectly runs
mvim scp://[server-name]//[...path...]/Makefile \
     scp://[server-name]//[...path...]/cobra.yaml
(mvim is the command-line name for the MacVim executable.)
The rule of thumb is, if you can ssh to a server, you can edit files on it.
What editor you use and how you invoke it is completely customizable. What the gui actually does is run hucksh-edit from your $PATH, which can do anything you want. As mentioned above, out of the box it runs mvim and adds scp://[server-name] to the file path.
Directory history

Hucksh remembers every directory you’ve visited in a shell window. By default it sorts them by last visited time, as shown, but you can also sort them by name or number of uses. Above you can see my recent directory usage as I type this tutorial, with the hucksh directory selected. If you press enter, you switch to the DIRS tab and the selected directory is displayed; or if you press Cmd-/Ctrl-Enter, you go directly to the active shell tab (the one with the “” at the end) and cd to that directory. I told you that “” would come in handy later.
The hucksh server also notifies other clients of directories you’ve used, so if you use a directory in one client, it’ll show up in the other.